Caching is one of the critical factors we analyze when finding the reasons for a slow WordPress website. It helps the page load faster and reduces server load, thereby speeding up the website. However, failing to manage expired cache can lead to more harm than good.
If you’ve ever updated your site but still see the old version, or noticed broken layouts and missing features, an outdated cache is likely the culprit.
In this guide, we’ll show you exactly how to clear WordPress cache in different ways; with and without a plugin, via hosting panel, CDN, DNS, and browser. We’ve got step-by-step instructions to make sure your visitors always see the most up-to-date version of your site.
Why You Should Clear WordPress Cache
When a visitor comes to your site, WordPress usually has to fetch content from the server at each HTTP request. This slows down the website speed and puts a recursive load on the server, leading to more wasted server bandwidth.
Your website falls into a loophole where it suffers from lower search rankings and higher bounce rate, especially when you’ve a huge visitors base.
WordPress cache is a temporary storage system that stores copies of your website content, i.e., text and images. Caching serves the pre-saved pages of your WordPress website rather than fetching data from the server database. As a result, customers get a fast response and save on server resources by up to 50%.
As said, this cache expires at a specific rate, which is why it’s crucial to clear the cache so your visitors see the most up-to-date version of your content.
But the main question is, “How often should I clear my WordPress cache?”
Well, you don’t have to clear your cache daily unless you make frequent changes to your website.
Here are a few common scenarios when clearing your cache becomes essential:
- After updating themes or plugins
- After editing posts, pages, or images
- After making design or layout changes
- When troubleshooting layout issues or bugs
- Before running performance or SEO tests
It all depends on how frequently your site content updates. You can schedule it weekly, biweekly, or monthly. Most caching plugins also rebuild the cache automatically after clearing it.

How to Clear Cache in WordPress
Method 01: Clear WordPress Cache with a Plugin
Using a cache plugin is the simplest way to clear and automate the cache policy within your WordPress website.
We’ve found WP Rocket to be the best performance plugin for WordPress websites that clears HTML files, optimizes CSS/JS, and rebuilds automatically (if configured).
- Click the “Clear Cache” button from the dashboard on the top admin bar. This will immediately clear all cache files.
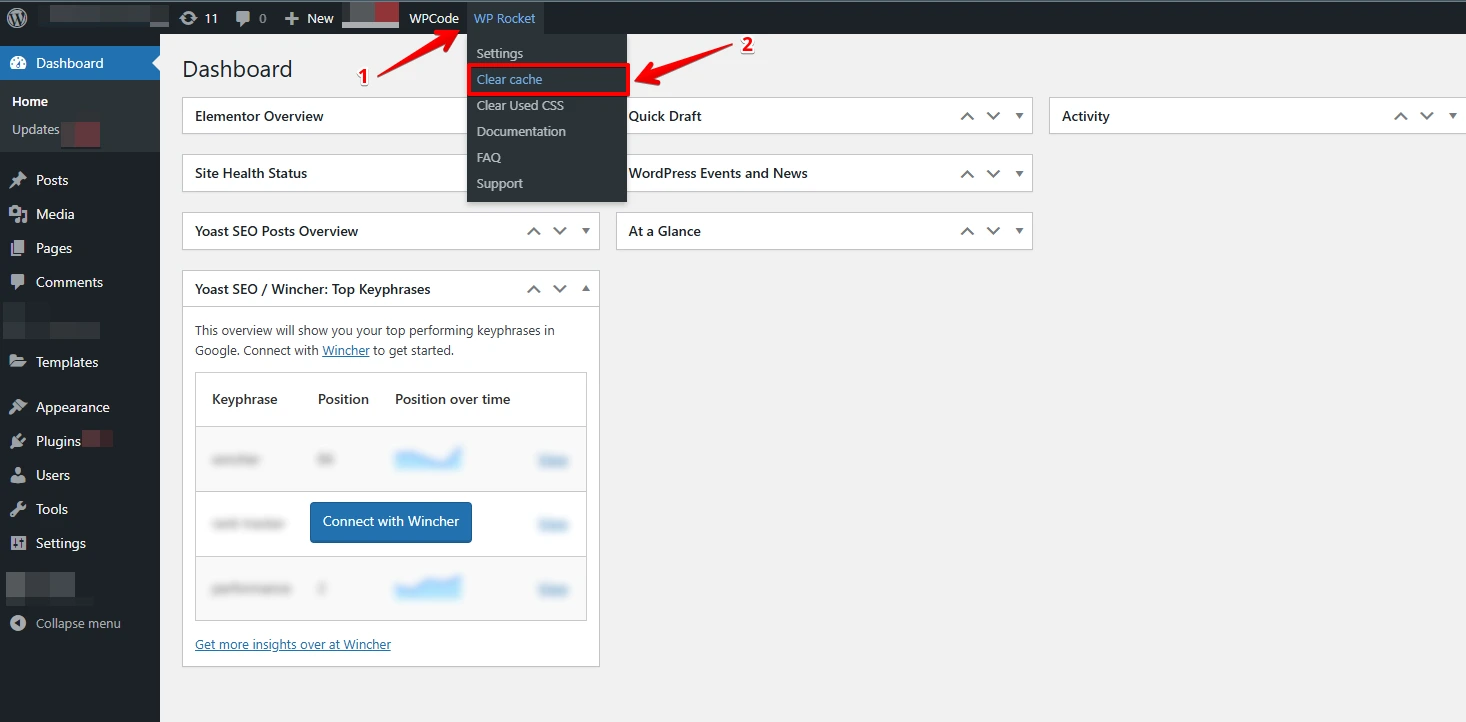
- Alternatively, you can go to Settings > WP Rocket in your WordPress dashboard and click the “Clear Cache” button.
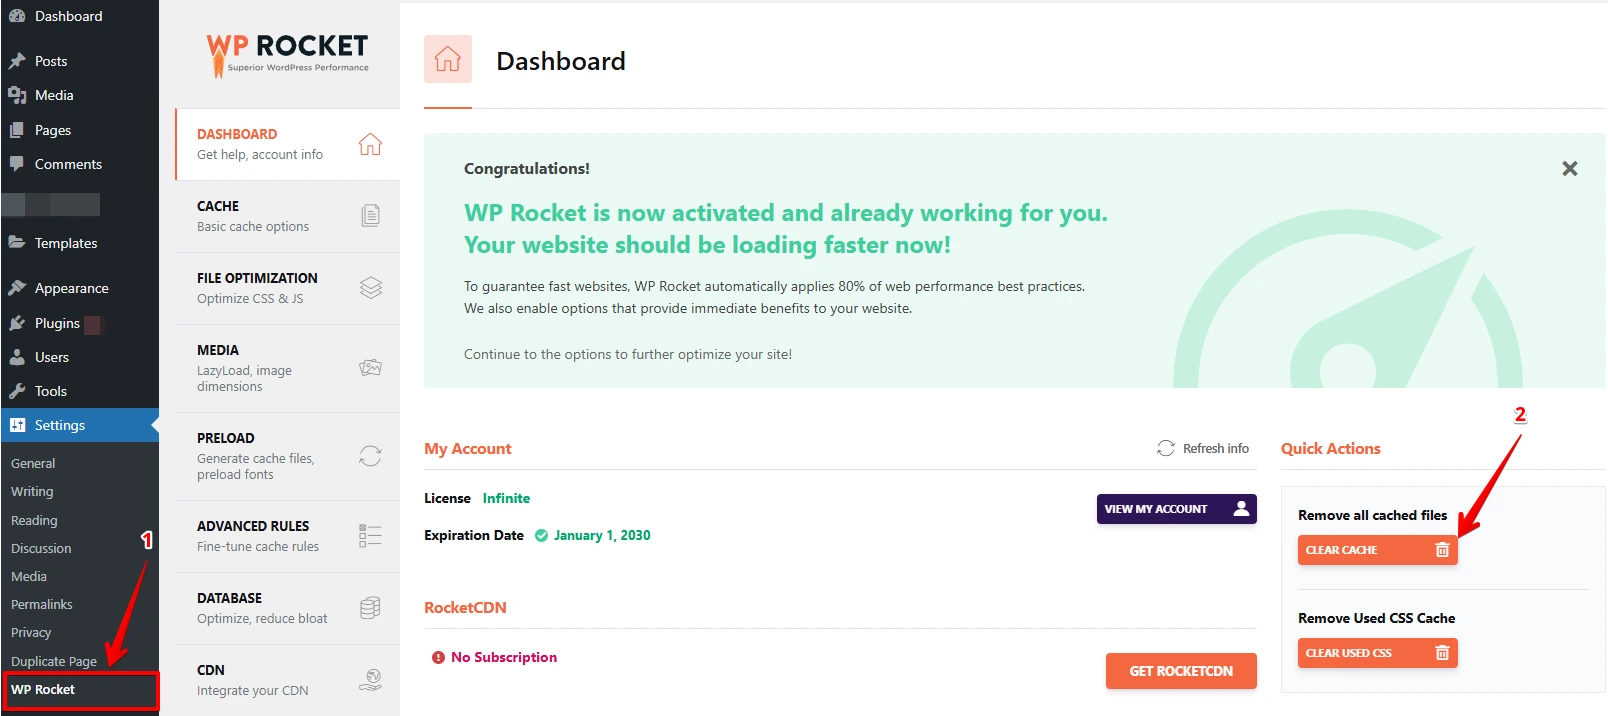
- Click “Preload Cache” to rebuild the cache immediately.
- Use “Purge OPCache” (if available) for advanced server-side cache clearing.
You can also clear the cache for a specific post or page:
- Go to Pages or Posts in your dashboard.
- Hover over the page/post you want to clear.
- Click “Clear this cache” from the options that appear.

The reason we recommend WP Rocket among several other options (W3 Total Cache, LiteSpeed Cache) is its all-around and conflict-free approach. You don’t have to play with multiple plugins to speed up your WordPress website.
If you’re looking for flexibility, check out our detailed guide on the list of best plugins to clear WordPress cache. It covers both free and paid options to help you choose the right one for your website.
Method 02: Clear WordPress Cache without a Plugin
Clearing WordPress cache without installing a plugin is also possible. You might need to tweak some settings in your hosting panel (like cPanel) and your CDN (if you use one) to fully clear or manage your website cache.
Here are three simple methods that will help you clear WordPress cache manually:
1. Clear Hosting Cache
Many WordPress hosts offer built-in server-level caching, which boosts performance by storing dynamic content. If you’re on managed hosting, caching is likely automatic; however, you should still clear it after major updates or design changes.
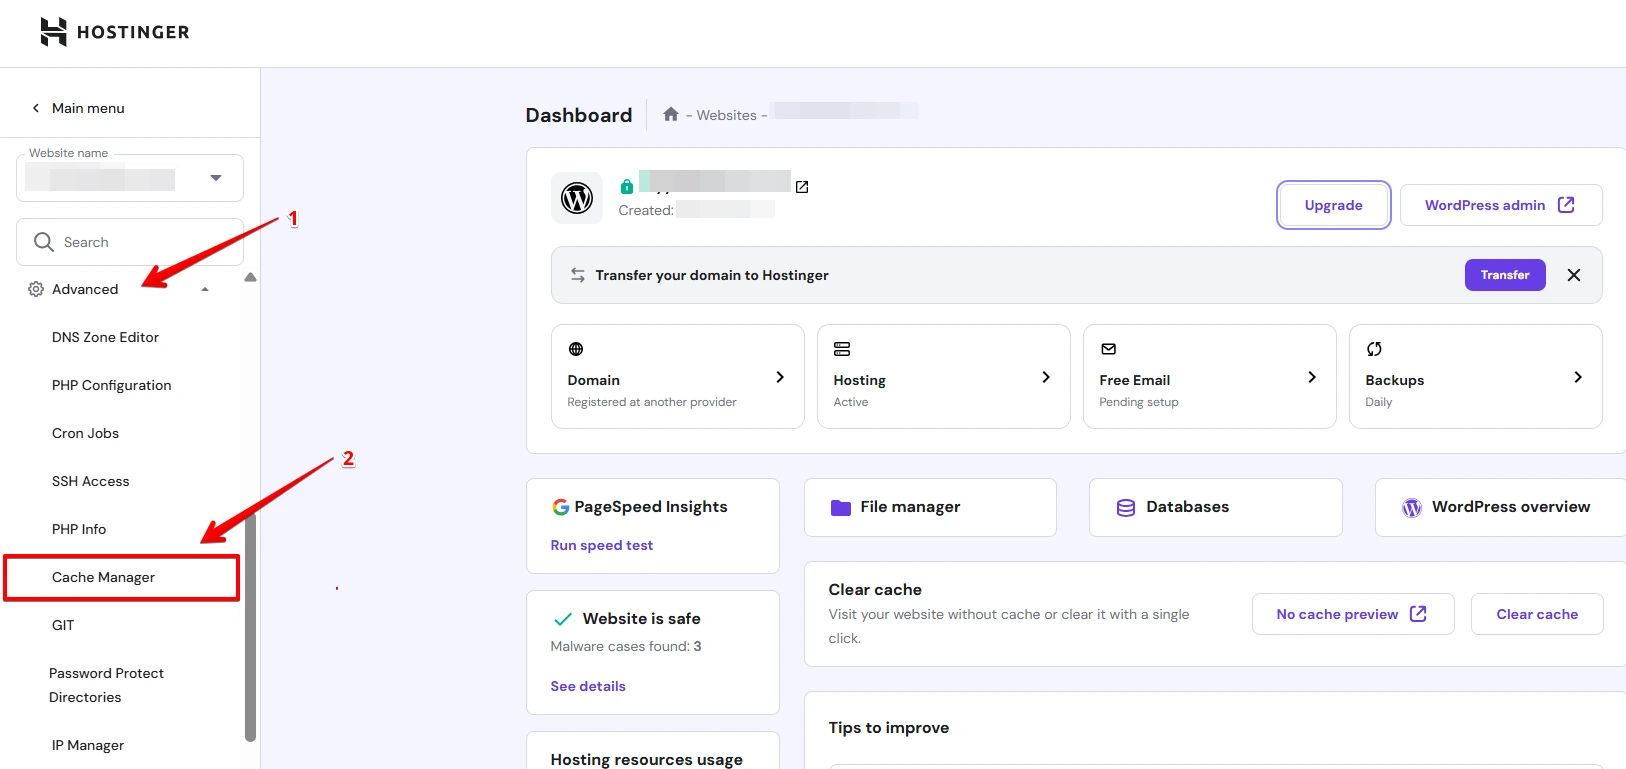
We’re using Hostinger HPanel as an example, but the method works the same for CPanel as well.
- Go to Advanced → Cache Manager (once logged in).
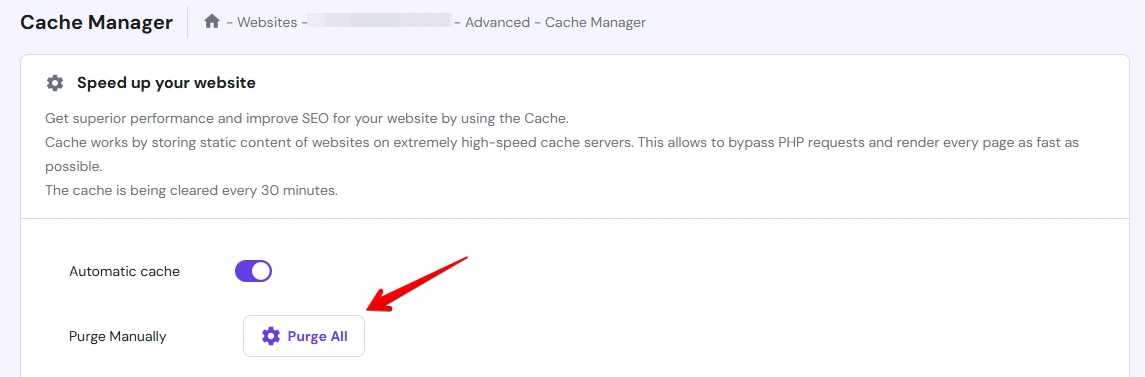
- Toggle Automatic Cache ON to let the system clear the cache every 30 minutes.

A success message will appear once automatic caching is enabled.
Manually Purge Cache:
- You’ll get a confirmation message once it’s done.
- Click the “Purge All” button to clear all cached files instantly.
Purge a Specific URL:
- Enter the specific URL in the Purge by URL field.
- Click “Purge” to clear the cache for that particular page only.
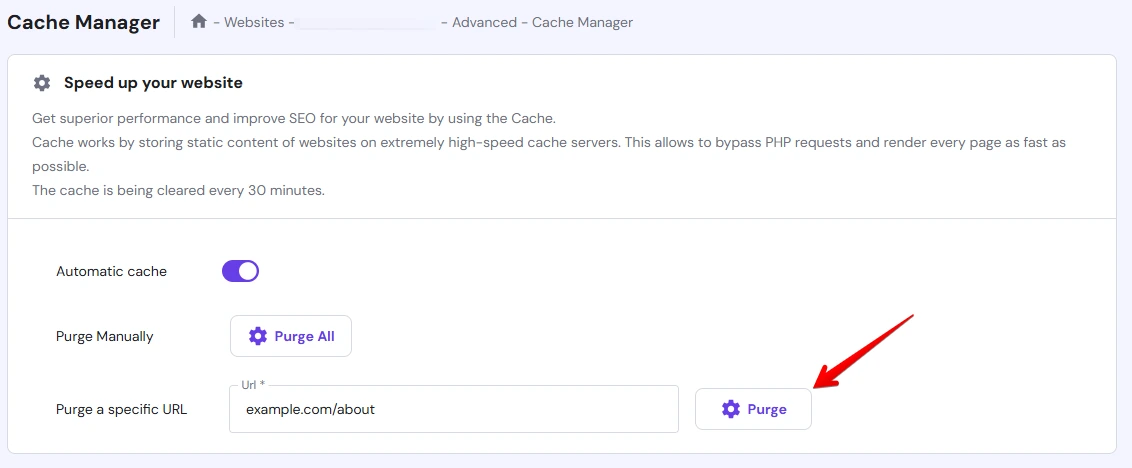
Use manual purge if you’re updating a specific blog post or product page and want the changes to reflect immediately.
Here’s how you can clear cache with other popular hosting providers:
| Hosting | Steps |
| Kinsta | Go to MyKinsta > Tools > Clear Cache |
| SiteGround | Use Site Tools > Speed > Caching |
| Bluehost | Dashboard > My Sites > Performance > Clear Cache |
| WP Engine | Dashboard or plugin > “Purge All Caches” |
NOTE: Hostinger supports LiteSpeed Cache, so if you’re using the plugin, make sure to clear both the server cache and the plugin cache for best results.
2. Clear CDN Cache (Cloudflare)
If you’re using a CDN like Cloudflare, your website changes may not appear immediately because the CDN is still displaying an old cached version.
To clear CDN cache,
- Log in to your CDN dashboard (CloudFlare, for example).
- Select your website.
- Go to Caching → Configuration.
- Click “Purge Everything” to clear all cached files.
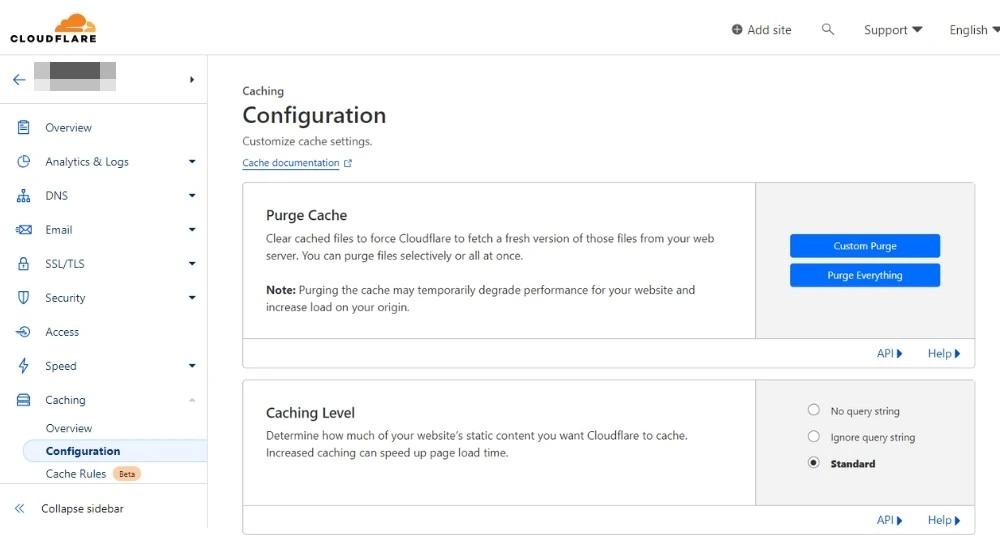
Note: “Purge Everything” clears the cache for your entire site. If you’re only updating a specific page, you can choose “Custom Purge” and enter the particular URL.
3. Clear DNS (Locally)
If you’ve already cleared your browser and plugin cache but your site still looks outdated, the issue could be your local DNS cache.
Your device stores DNS data to help websites load faster; however, this stored data can become stale and needs to be refreshed.
Flushing your DNS cache forces your system to update its connection to websites, which can help load the most recent version of your site.
On Windows:
- Press Win + R, type cmd, and hit Enter.
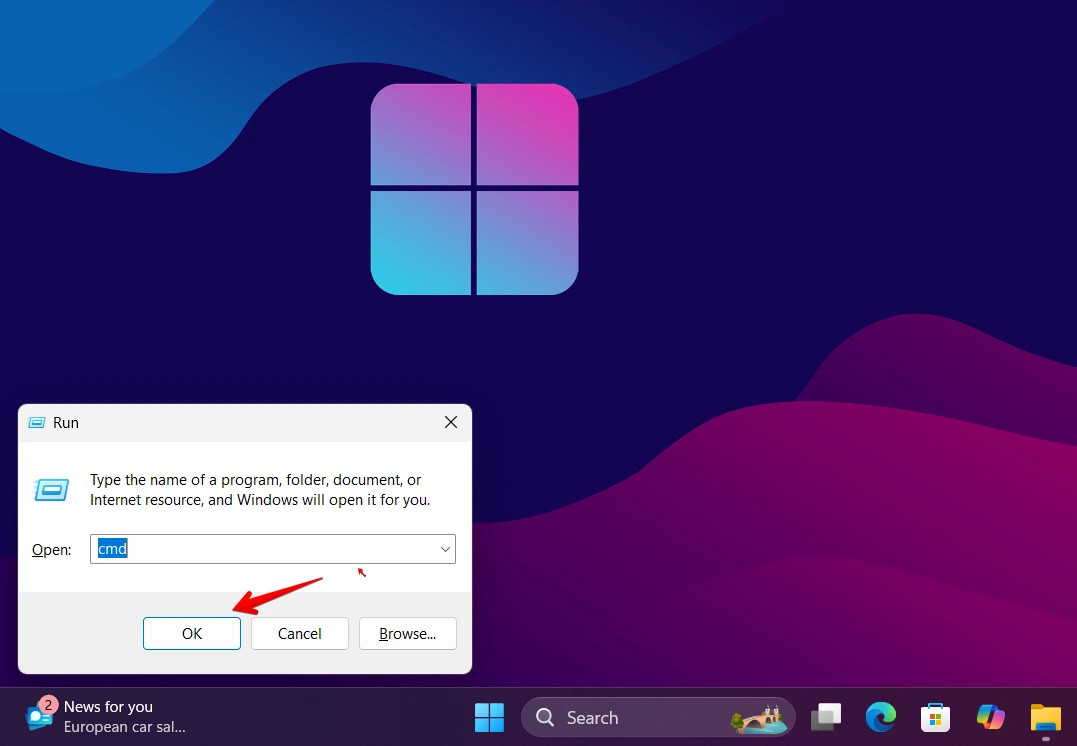
- In the prompt, type this command line to clear the cache:
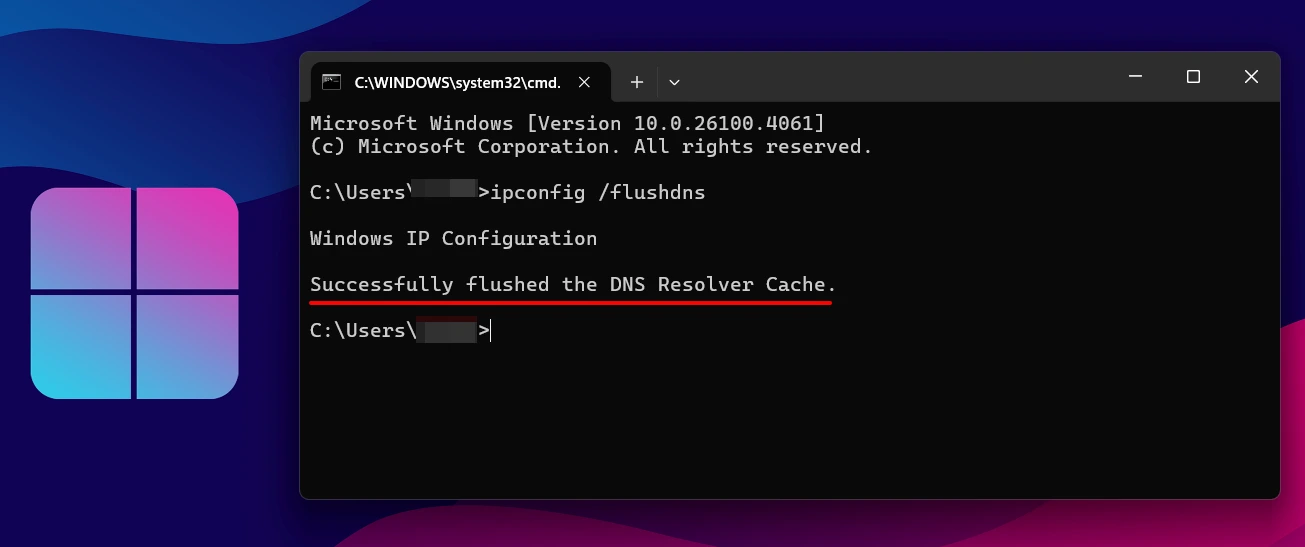
ipconfig /flushdns- Press Enter to clear your DNS cache. You’ll see a success message.
On macOS:
- Open Terminal (Applications > Utilities > Terminal).
- Use the command below based on your macOS version:
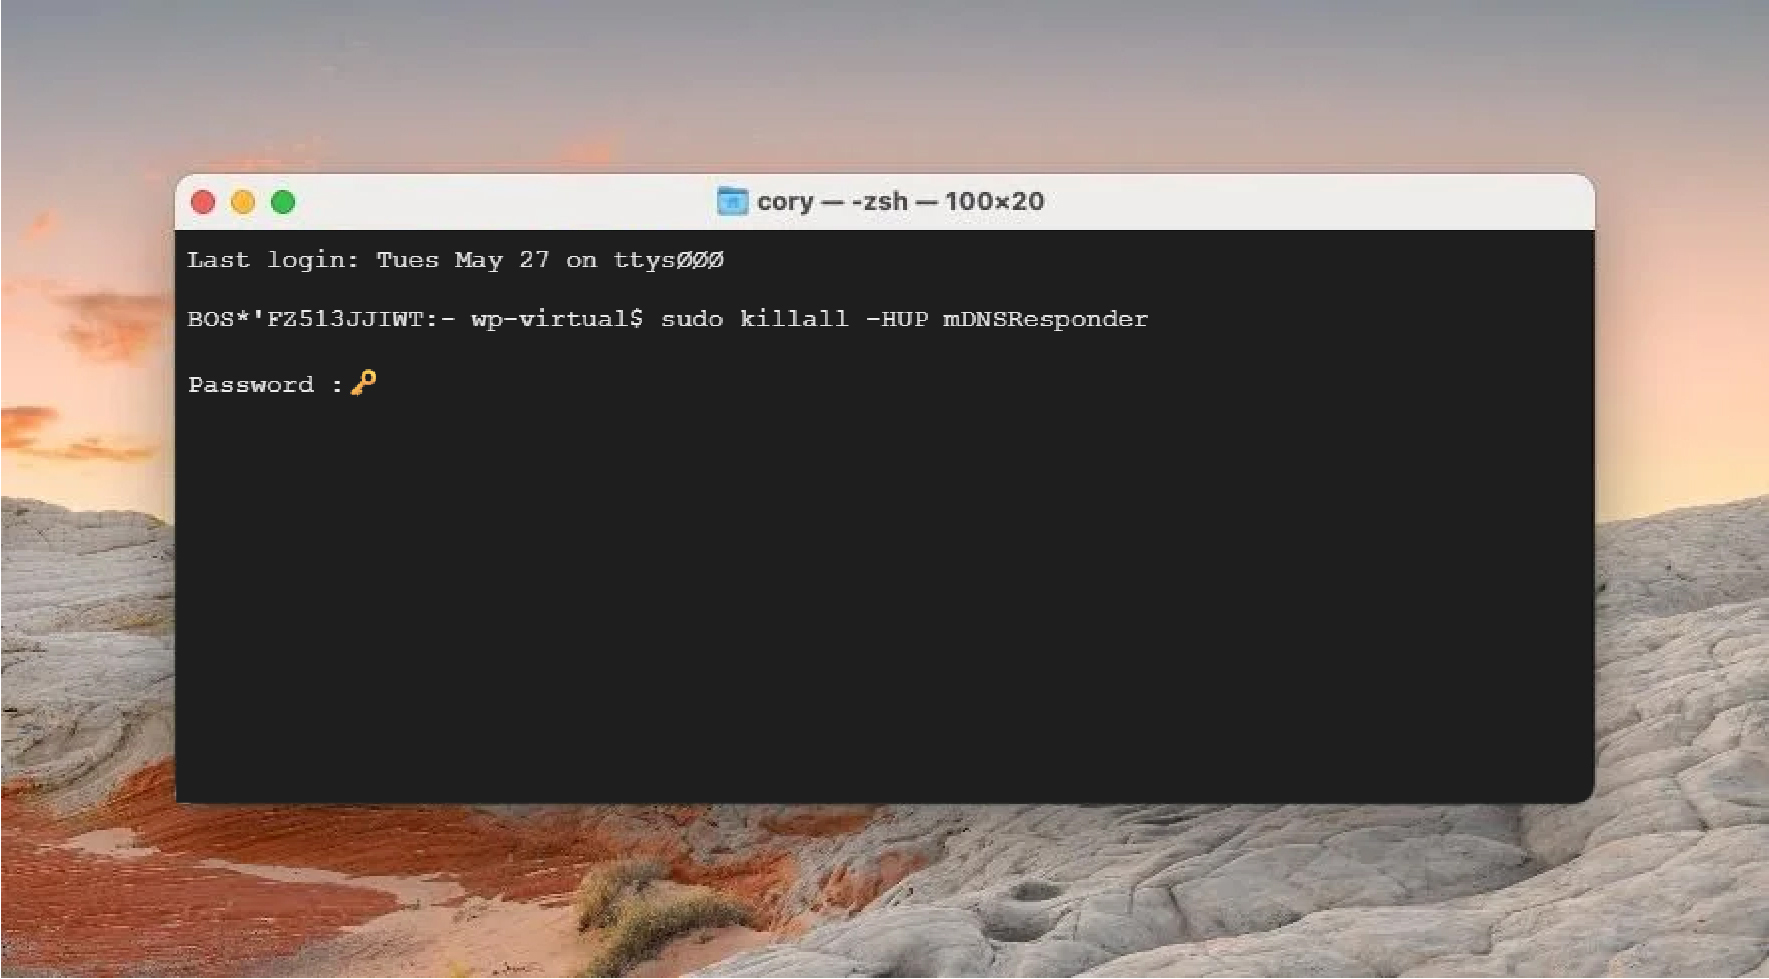
- 10.10.4 and above: sudo killall -HUP mDNSResponder
- 10.10.1 – 10.10.3: sudo discoveryutil mdnsflushcache
- 10.7 – 10.9: sudo killall -HUP mDNSResponder
- 10.5 – 10.6: sudo dscacheutil -flushcache
After flushing your DNS cache, restart your browser and reload your website to ensure the changes take effect.
4. Clear Cache Using WP-CLI
If you’ve SSH access, using this command line will clear the object cache used by WordPress internally.
Clear Cache Using WP-CLIMethod 03: Clear Browser Cache
Sometimes, your website changes don’t show up even after clearing the cache manually or with a plugin. That’s because your browser might still be loading an old version of the site from its local cache.
The browser cache stores images, CSS files, and scripts to help websites load faster on subsequent visits. While this speeds up browsing, it can cause problems when you’ve made updates to your site.
Here’s how to clear the cache in major browsers:
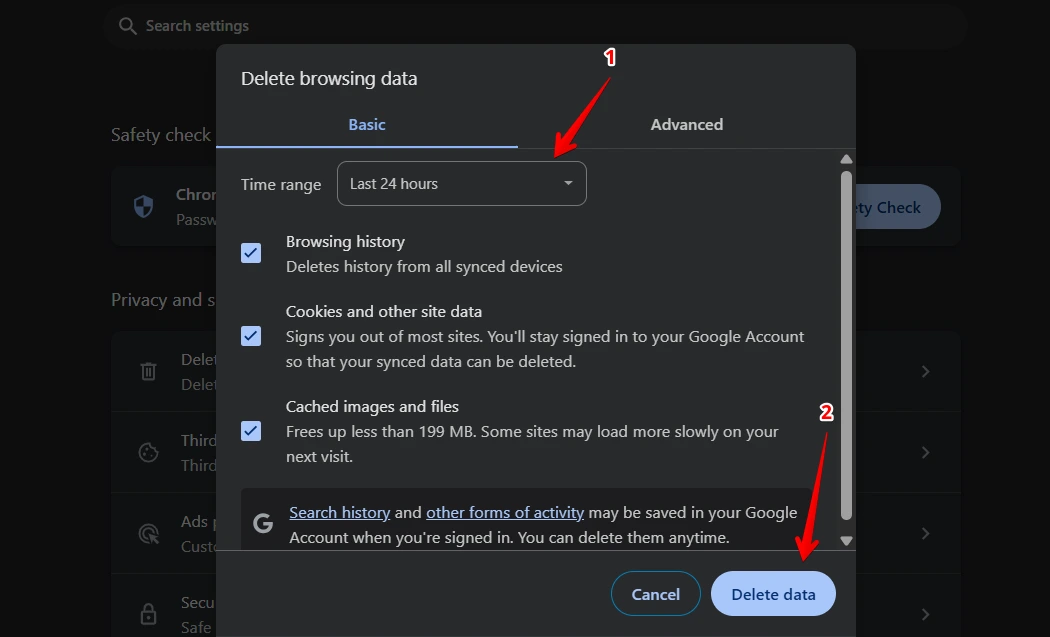
- Google Chrome: Press Ctrl + Shift + Delete, choose a time range, then click Clear Data.
- Mozilla Firefox: Press Ctrl + Shift + Delete, pick a time range, then click Clear Now.
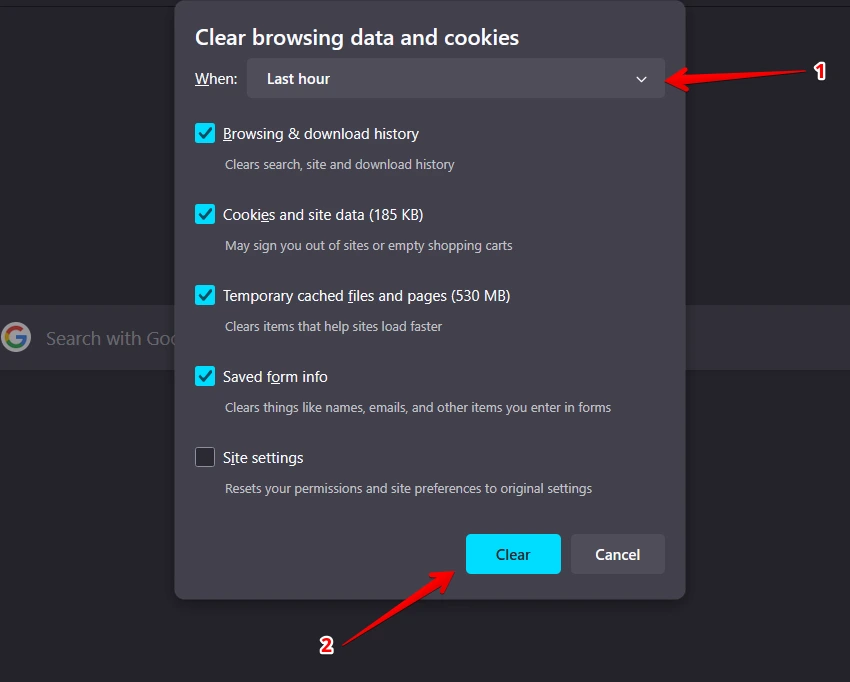
Restart your browser after clearing the cache and cookies, then revisit your site to ensure everything loads fresh and without errors.
A hard refresh works in most major browsers, but the key combination can vary depending on your operating system and browser.
| Browser | Windows Shortcut | Mac Shortcut |
| Microsoft Edge | Ctrl + F5 or Ctrl + Shift + R | Cmd + Shift + R (via Chromium engine) |
| Safari | N/A (No F5 support) | Cmd + Option + R |
| Opera | Ctrl + F5 or Shift + Reload icon | Cmd + Shift + R |
FAQs: Clearing WordPress Cache
Can I automate cache clearing in WordPress?
Yes, with the correct setup, you can automate cache for your WordPress website.
Most cache plugins, such as WP Rocket, W3 Total Cache, or LiteSpeed Cache, automatically purge and preload the cache. Alternatively, you can use cron jobs or custom scripts for advanced control.
How do I know if caching is causing an issue on my site?
If your website changes aren’t showing, the layout looks broken, or visitors see outdated content, it’s a sign that your cache may not be working correctly.
To confirm, you can view your site in incognito, try changing the device, or clear your browser cache.
What should I do if clearing the cache doesn’t reflect changes?
Try a full purge (plugin + CDN + browser), then hard refresh. If it still fails, there might be a deeper issue, like file permissions or theme conflicts.
Ending Note
Clearing your WordPress cache is a simple yet powerful way to resolve display issues, improve site speed, and ensure that your visitors always see the latest updates.
By effectively managing cache on your website, you can enhance your site’s performance, SEO, and conversion rates.
Before applying any method from this guide, we recommend taking a website backup.
If you’d rather not take chances or deal with the technical side, our WordPress virtual assistant services is here to help.